


With texting now more common than calling for many people, and many now using VoiP services instead of cellular calls, you may not hear your ringtone on the best iPhones of today as much as you would on the ones of yesteryear. Still, when your phone does ring, it’s nice to hear something a bit more unique than the default ringtone that everybody else is using. For one thing, it helps you know that it’s your iPhone that’s actually receiving a call, but it’s also a nice way to express your own style.
You can create original, custom ringtones to add a bit of personal flair to your iPhone experience. The sky’s the limit when it comes to your options — if you can hear it, you can make a ringtone out of it. You can use any non-copy-protected song in your music library, create your own custom jams in GarageBand, or check out some ready-made collections of ringtones for inspiration.
The only rule is that ringtones can’t be longer than 30 seconds, but that shouldn’t be a problem as your iPhone won’t likely ring for that long anyway — and it’s probably not a good sign if you’re more interested in listening to your ringtone finish than actually talking to the person who is calling you.
How to make your ringtone a song from your computer
You can create a ringtone from just about any song in your iTunes or Music library — as long as you’ve purchased the song, that is. You won’t be able to create ringtones from Apple Music tracks since those are copy-protected. Ditto for other streaming apps like Spotify
Further, if you have tracks in your library that were purchased from the iTunes Store prior to 2009, these may also be copy-protected unless you updated them to the new “iTunes Plus” format.
If you’re using Windows or an older version of macOS, then iTunes will be the go-to app for this. With the 2019 release of macOS Catalina, Apple replaced iTunes with a new app simply called “Music.” Don’t let the new name fool you, though; the macOS Music app is basically still iTunes under the hood. Apple simply trimmed out all the non-music features and put those into separate apps.
This means that the steps for creating a ringtone are essentially the same whether the app you’re using is named “iTunes” or “Music,” although some of the menu options differ slightly between the Windows and Mac apps.
Step 1: Launch Music or iTunes and choose a song from your collection.
iPhone ringtones play continuously in 30-second (or less) loops, so after choosing your song, note the start and stop times for the portion you want, up to a maximum of 30 seconds.
Step 2: If a cloud icon appears beside your chosen song, right-click (or control-click) and choose Download from the context menu to download it from the cloud to your Mac or PC.

Step 3: Once the download completes (if applicable), right-click or control-click the song you want and select Song Info (Windows) or Get Info (Mac) from the resulting drop-down list.
Step 4: Select the Options tab at the top of the window.
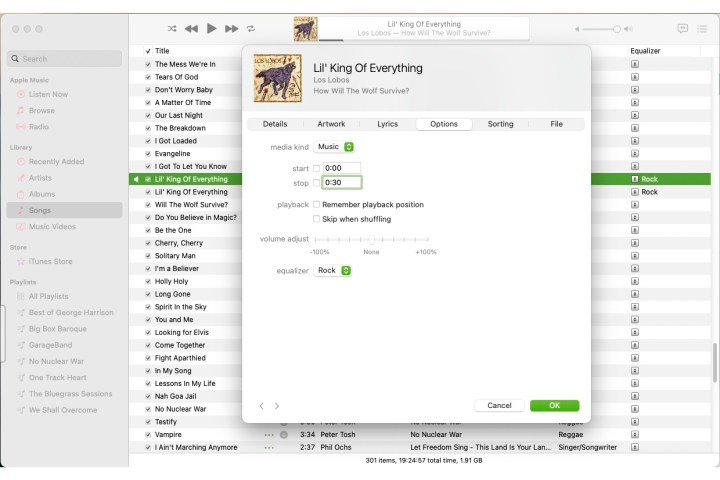
Step 5: Enter the start and stop times you noted in step 1 into the “Start” and “Stop” fields. The range between these can be as short as one second, but should not exceed 30 seconds.
Step 6: Choose the OK button.
Step 7: Next, you’ll need to create a copy of your chosen music file in the AAC format. Since you set the start and stop times, the copy will include only that selected portion.
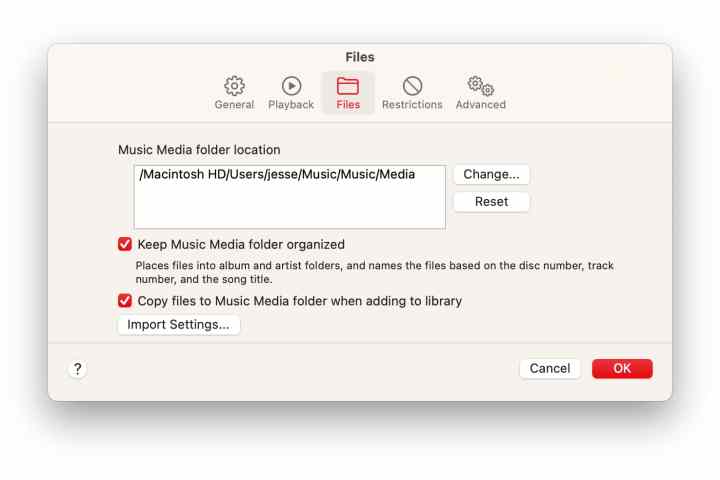
You’ll first need to ensure that the default format is set to AAC. Here’s how:
- On Windows, select Edit > Preferences; on Mac, select iTunes > Preferences or Music > Settings depending on which version of the app you’re using.
- From the Settings dialog, choose Files.
- Select Import Settings
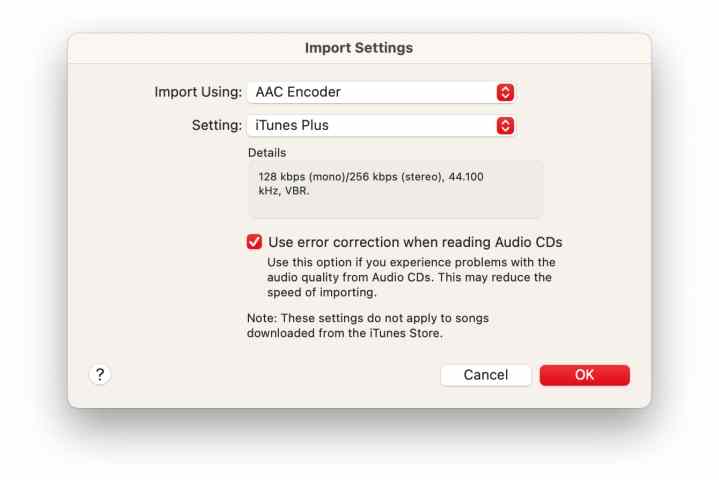
- From the Import Using dropdown, select AAC Encoder.
- Choose OK to close the Import Settings.
- Choose OK again to close the iTunes/Music settings.
Step 8: With your chosen track highlighted, select File > Convert > Convert to AAC Version (Windows) or File > Convert > Create AAC Version (Mac). If this says something like “MP3 Version” instead of “AAC Version,” double-check your settings in the previous step to ensure the default format is set to AAC.

Step 9: The conversion should take a few seconds, after which a new trimmed copy of the song should appear in your library below the original.
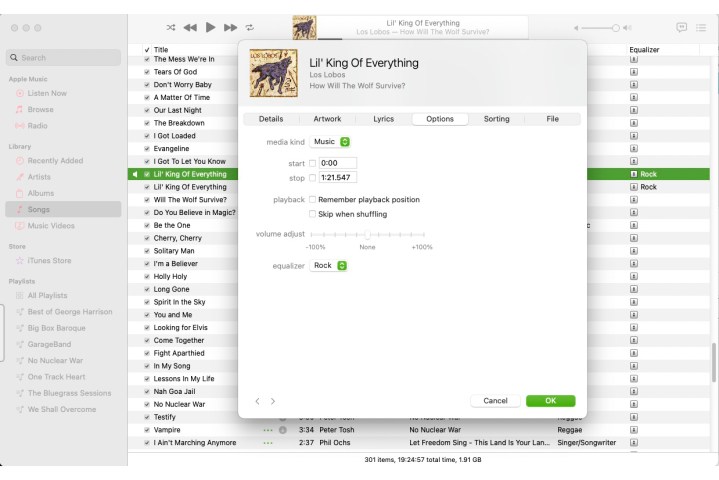
Step 10: Go back into the original song’s info page (from steps 3 through 5) and revert the start and stop times to their original settings so that the full track will play properly the next time you listen to it.
Step 11: Copy the new, shorter version of your song from iTunes or Music to your Desktop or another location by dragging it from the iTunes/Music window and dropping it into the appropriate spot in Finder or Windows Explorer.
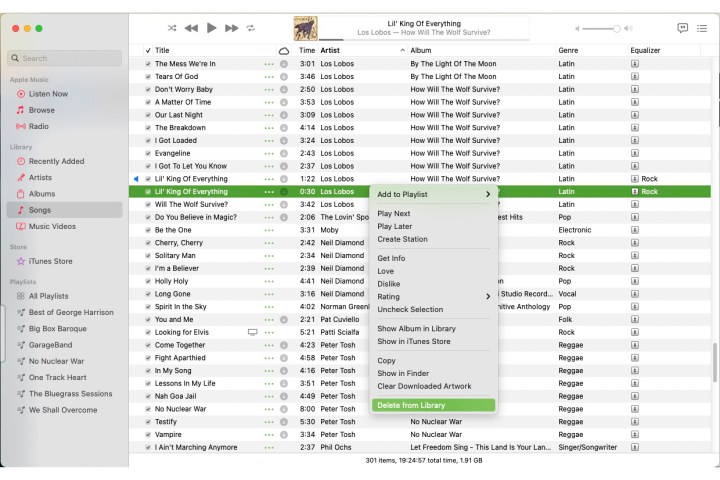
Step 12: Once you’ve successfully copied the new track to another location, you can delete it from your music library by right-clicking or control-clicking the track and selecting Delete from Library from the resulting drop-down menu. Confirm you want to do this by Delete File or Move to Trash depending on the platform and version of iTunes or Music you’re using.
Step 13: Using Finder or Windows Explorer, rename the music file you copied in step 11 to change it to an .m4r extension.
AAC files created in iTunes or Music use the file extension .m4a by default, however, the file must have an m4r extension to be recognized as a ringtone by your iPhone.
Step 14: Connect your iPhone to your computer using a USB or USB-C to Lightning cable. Your iPhone should appear in the left-hand sidebar of iTunes or Music.
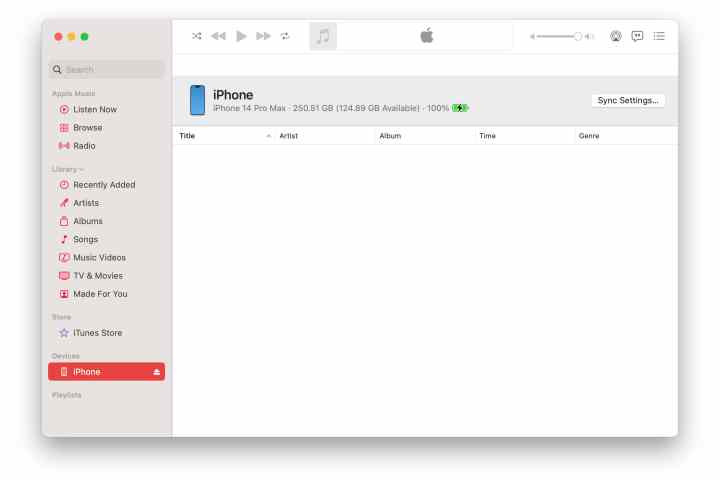
Step 15: Drag your ringtone file from Finder or Windows Explorer onto your iPhone in the sidebar in iTunes or Music. This will copy the ringtone to your iPhone.
Note that in some earlier versions of iTunes you may need to expand your iPhone first in the sidebar by clicking on the triangle to the left of it and then drag your ringtone directly into the Tones section.
How to create a custom ringtone using GarageBand
If you’d rather create your ringtone directly on your iPhone, Apple’s free GarageBand for iOS is the best way to go. Use it to trim your favorite part of a song and set it as your default ringtone. Before you get started, be sure to install the mobile GarageBand app from the App Store on an iPhone running iOS 11 or later.
Launch the GarageBand app and find the song you want to use. It’s best to have the music track on your iPhone already. If you haven’t already shortened it to 30 seconds, GarageBand will do that automatically, though it may not be the 30 seconds you want.
Step 1: Download and launch GarageBand on your iPhone.
Step 2: Select the + in the top right corner to create a new song.
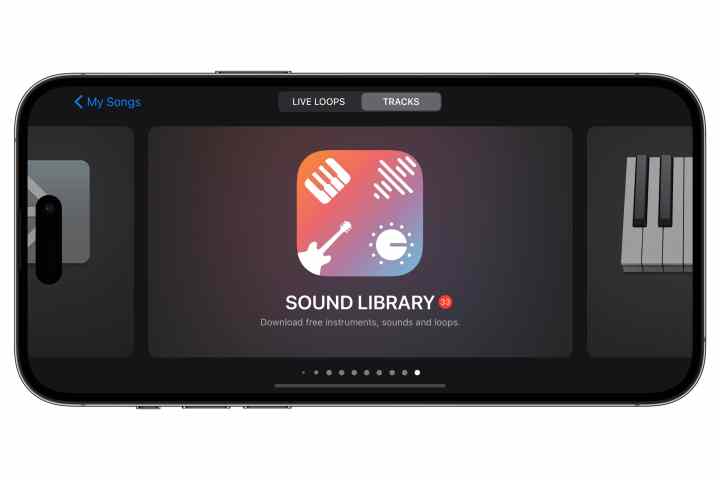
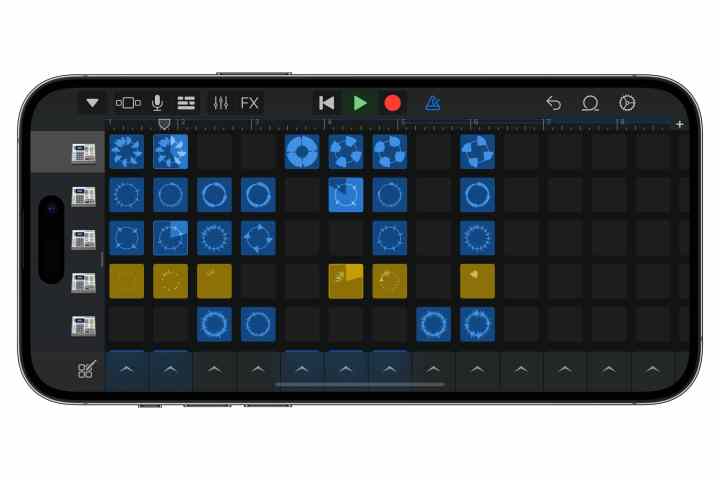
Step 3: Choose an available instrument from the Tracks tab to record a live performance or a category of loops from the Live Loops tab to use a predefined loop.
Step 4: Select the red Record button to begin recording using your chosen digital instrument or loops.
Step 5: When finished recording, tap the Record button again to stop.
Ensure your final track is no longer than 30 seconds. If it’s longer you can delete and re-record, or trim it down using the tools in GarageBand.
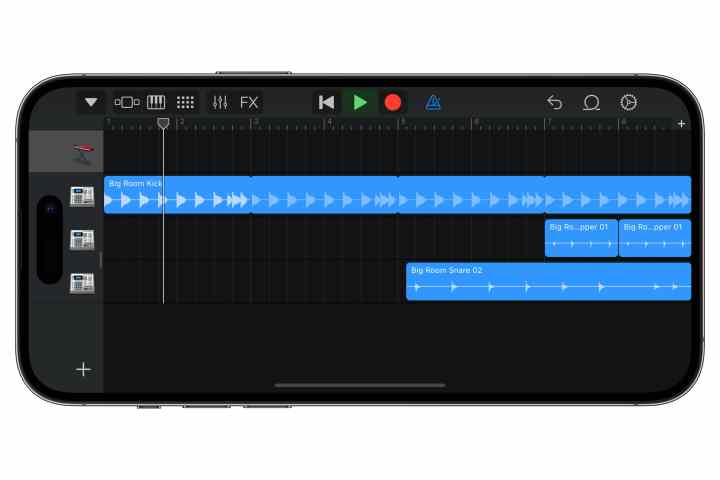
Step 6: Use the green Play button to preview your track, or select the down arrow in the top left corner to return to your list of songs.
Step 7: Select Rename to give your track a more meaningful name. This is what will be used to identify it in your list of ringtones.
Step 8: Long-press on your renamed song to bring up the pop-up menu again.

Step 9: Select Share.
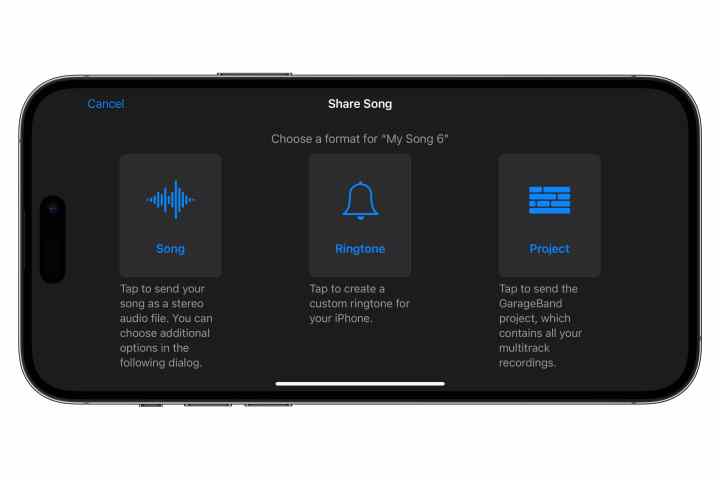
Step 10: Choose Ringtone.
Step 11: Enter a name for your ringtone if you’d like to use something different from the song name.

Step 12: Select Export in the top-right corner.
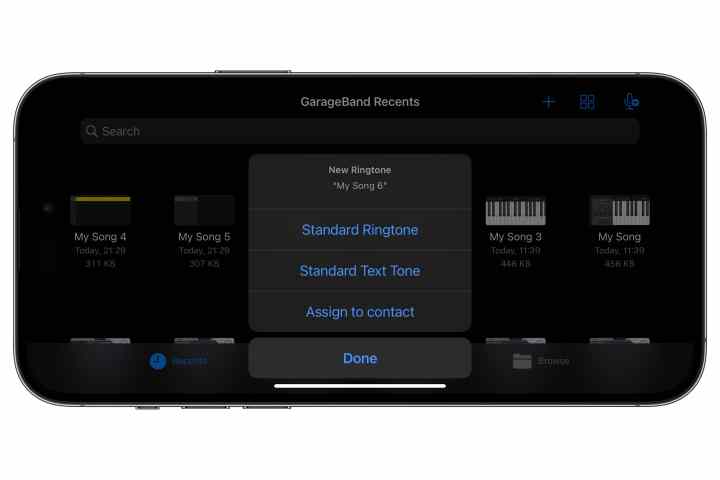
Step 13: Once the export has completed, you can select Use sound as… from the pop-up menu that appears to immediately set the new track as the standard ringtone, or standard text message tone, or assign it to a specific contact.
Alternatively, choose OK if you’d simply like to leave it in your ringtone library for later use.

How to buy an iPhone ringtone from the iTunes Store
The simplest way to get a new ringtone for your iPhone is to buy one from the iTunes Store directly on your device. That will set you back between $1 and $1.29 per track, though, so it’s hardly the cheapest option. Nevertheless, if there’s a song in Apple’s collection that you’re just dying to have as a ringtone, it’s a really easy one-click solution that just works.
Step 1: Open the iTunes Store app on your iPhone.
Step 2: Select the More button in the bottom-right corner.
Step 3: Select Tones.
Step 4: Select a tone from the list or use the Genres, Featured, or Charts buttons to browse for more tones.
Step 5: From the details screen, select the name of the tone to listen to a preview or tap the price button to purchase the ringtone.
Once purchased and downloaded, the new ringtone or alert tone will appear in the appropriate section alongside the built-in tones, which can be found in the Settings app under Sounds & Haptics.
How to use your new ringtone on the iPhone
Now it’s time to use your new ringtone. Note that in addition to using your new ringtone for calls, you can also set it as an alert tone for new voicemails, incoming text messages, emails, calendar alerts, and reminder alerts. You can even use a custom ringtone to replace the “swoosh” sound you hear when sending messages in Apple Mail.
Note that you can only use custom ringtones for Apple’s own built-in apps like Messages, Mail, Calendar, and Reminders. Third-party apps like Facebook, Twitter, and Gmail all have their own sounds that can’t be overridden in your iPhone’s system-wide settings. Some third-party developers may let you use your own alert sounds, but that’s entirely up to them.
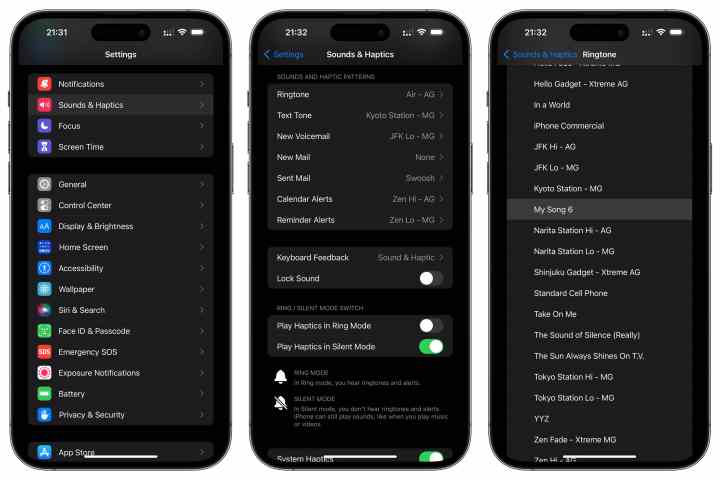
Step 1: Open the Settings app on your iPhone.
Step 2: Select Sounds & Haptics. (this may simply say Sounds in older versions of iOS).
Step 3: Select Ringtone under “Sounds and Haptic Patterns” to choose your ringtone for incoming calls.
Alternatively, you can choose another option, such as Text Tone or New Voicemail, to change the alert tone for those items.
Step 4: If you’ve selected ringtones, your list of custom tones will be grouped alphabetically at the top of the screen, followed by Apple’s built-in ringtones and alert tones. When viewing tones for alerts, such as Text Tone and New Voicemail, this will be reversed, with built-in alert tones shown at the top, followed by your custom tones, and then Apple’s ringtones at the bottom.
Step 5: Select the custom ringtone you’d like to use. A preview of the tone will play, and a checkmark should appear beside it to indicate it’s selected.
Step 6: Choose Sounds & Haptics in the top-left corner to return to the previous screen, or swipe up or press your home button to return to the home screen if you’re finished choosing custom tones.

How to remove a custom ringtone from your iPhone
Ringtones are very small, so you don’t need to worry about them taking up too much space on your iPhone. However, if you’ve installed a custom ringtone you no longer want cluttering up your ringtone list, you can remove it from there directly on your iPhone. Here’s how.
Step 1: Open the Settings app on your iPhone.
Step 2: Select Sounds & Haptics.
Step 3: Select Ringtone.
Step 4: Locate the custom ringtone you’d like to remove, and swipe from right to left to reveal the Delete button. Select Delete or continue swiping to erase the ringtone from your iPhone.
Note that there’s no confirmation prompt here, so make sure the ringtone you’re removing is the right one. If you remove a ringtone that you purchased from the iTunes Store, you can recover it by using the Download All Purchased Tones option at the top of the screen. Ringtones that you created yourself will need to be restored from their original files via iTunes, Music, or GarageBand.
Editors’ Recommendations


