





While using a Windows PC over a MacOS system (or vice versa) was once fairly limited in terms of crossover, such towering walls no longer exist. Still though, if you’ve ever wanted to use the same external hard drive with both Windows and MacOS, you know how big of a burden this process can be.
Incidentally, the term “external hard drive” generally refers to portable storage devices. They’re as fast as the best SSDs, but you can connect them to your computer using a USB cable.
A process called ‘partitioning’ is available with both Windows and MacOS. When you partition a hard drive, you’re basically splitting its internal storage space into different sections. These sections can then be formatted to work with many different types of computers.
You can partition a hard drive using both Windows and MacOS, and we’re going to teach you how to complete the process for each OS type.

It’s a split, niche scenario
A quick Google search may lead you to believe you’re on the right path by formatting your drive with Extensible File Allocation Table, or exFAT. It’s a simpler, universal method if every file you store is less than 4GB in size. However, this format doesn’t support larger files, which can be problematic for transferring and so on between Macs and Windows 11 PCs.
Meanwhile, the NTFS system used by Windows 10 supports large files, but this format can’t be read natively by MacOS. That puts you in a peculiar pickle, limiting any shared file between the two platforms at 4GB or smaller. If you want to save larger files, you’ll need to create a second, dedicated space using a format optimized for MacOS (Extended) or Windows 11 (NTFS).
With all that in mind, our guide splits the external drive in half: One primary section capable of storing files larger than 4GB, and a secondary section capable of sharing files between MacOS and Windows 11. It’s not the ideal solution — we get it — but it works nonetheless.
Before digging in, select a primary format you’ll use the most: MacOS Extended if you primarily use Mac with a secondary exFAT partition, or NTFS if you mainly use Windows 11 with a secondary exFAT partition.
Finally, formatting deletes all data stored on the drive. Make sure you back up anything important before beginning the formatting process. We have guides for backing up Windows and backing up MacOS in case you need a helping hand.
Partition the drive on Windows 11
We have a full guide on how to partition a drive in Windows, but let’s go through the important steps you need to know to quickly partition the drive while working on Windows. The process is less straightforward in Windows than what you see on a Mac, but it’s now easier than ever.
Step 1: Right-click on the Start button and select Disk Management on the Power User menu.
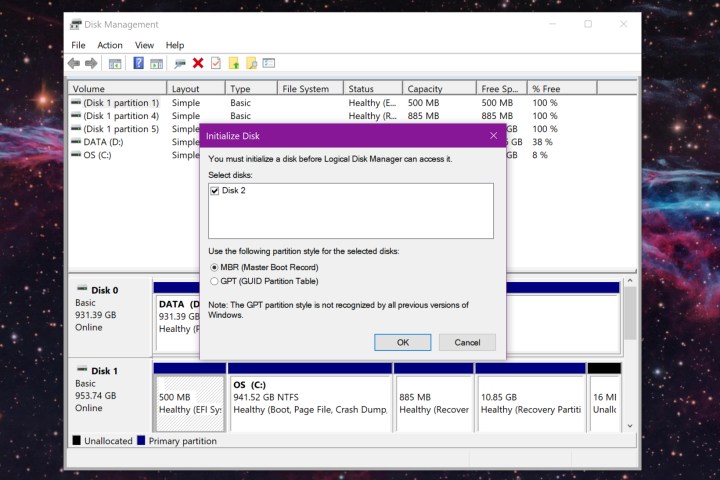
Typically, external drives are formatted out of the box. However, you may encounter a “Not Initialized” error when connecting the device to your PC. That means it’s not formatted correctly to work with Windows. It won’t even have an assigned drive letter in File Explorer (This PC), and may not even have allocated space for saving data.
If you see an Initialize Disk pop-up window, it provides two formats: Master Boot Record (MBR) and GUID Partition Table (GPT). The former is older and only supports capacities up to 2TB, but is compatible with older versions of Windows. GPT is a newer format supporting larger capacities but isn’t compatible with older versions of Windows.
Select the partition style and click the OK button to continue. If you accidentally closed the pop-up, right-click on the listed disk and select Initialize Disk on the pop-up.
If you didn’t get the pop-up warning, move on to Step 2.
Step 2: Right-click on the unallocated space, and select the New Simple Volume option on the pop-up menu, as shown below.

Step 3: The New Simple Volume Wizard begins. Click the Next button.

Step 4: Since we’re creating two partitions, divide the listed physical number in half. Type that number into the field next to Simple Volume Size in MB and click the Next button to continue. In our scenario, we’re dividing a 1TB SanDisk Ultra solid-state drive.
Step 5: Allow the Wizard to assign a drive letter, or manually assign the letter using the drop-down menu. Click the Next button to proceed.
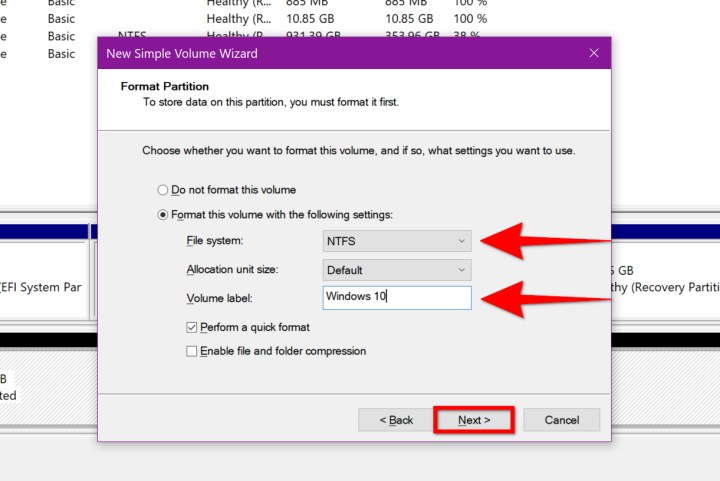
Step 6: Select a file system. Since your primary PC is Windows 11, use NTFS. Also enter a volume label (drive name) — we used “Windows 10,” though you can label this partition with anything. Click the Next button to proceed.
Step 7: Click the Finish button to complete.
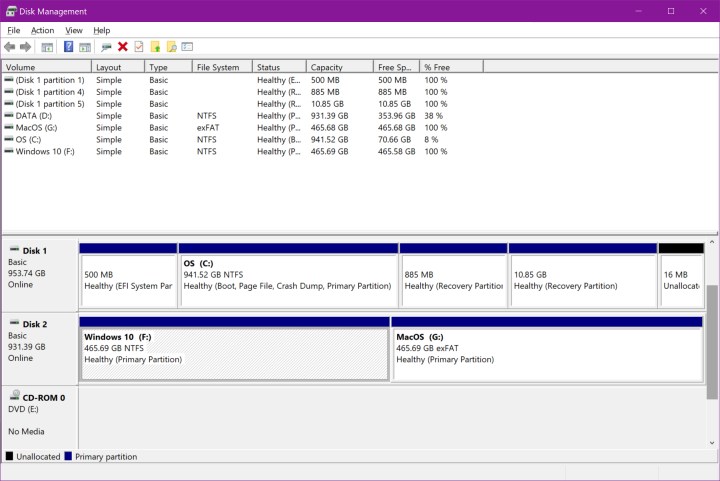
In Disk Management, the external disk should list one new volume — “Windows 10” in our example — and a second portion with unallocated space.
Right-click on that unallocated space and repeat step 1 to step 6. This time, however, choose exFAT as the file system during step 6, which you’ll use to share files with MacOS. Note that you don’t need to specify a volume size.
The result should look something like this:
Partition the drive in MacOS Sonoma
Partitioning an external drive in MacOS isn’t quite as troublesome. Assuming that your external drive has no partitions, you will need to create two. If the drive already has a Mac-friendly partition, you can skip ahead to step 5.
You may first see an “initialize” error because the drive’s file system isn’t “readable.” Click on the Initialize button on the small pop-up screen to create your first compatible partition and begin at step 5. If the error does not appear, start with step 1.
Here, we used the same SanDisk SSD, although MacOS pulled the Seagate USB adapter’s name rather than the drive’s actual name (the adapter came from an external Seagate drive). Note that the following instructions also apply to Catalina — the only real differences are the visual changes to the UI and how internal volumes are listed.
Step 1: With Finder highlighted, click Go on the menu bar followed by Utilities on the drop-down menu.
Step 2: Double-click the Disk Utility icon in the following window.
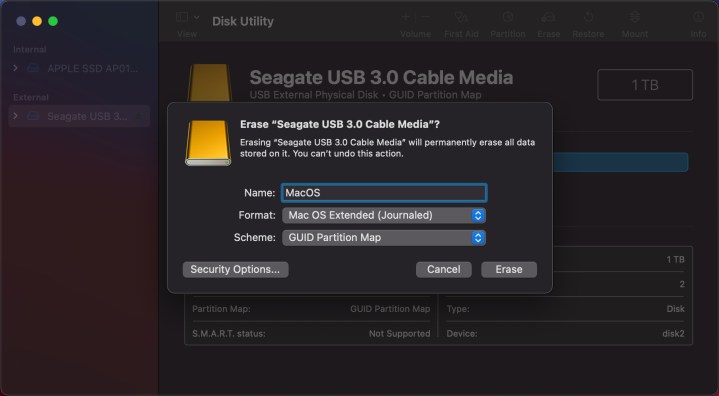
Step 3: With Disk Utility open, your drive appears under External located on the left. Click Erase, located on the app’s top toolbar, as shown below.

Step 4: In the following pop-up window, enter a name. Select MacOS Extended (Journalist) as the format and GUID Partition Map as the scheme.
Step 5: Click the Erase button to make these changes.
Step 6: Once complete, your drive should have a single partition. Highlight the drive again in Disk Utility and then click Partition listed at the top instead.
Step 7: On the following pop-up (it won’t move), click the small Plus button located under the blue pie chart to add a second partition.
Step 8: A second portion appears, slicing the pie graph down the middle. Enter a volume name (we chose Windows) and select the exFAT format.
Step 9: Click the Apply button to add the new partition.
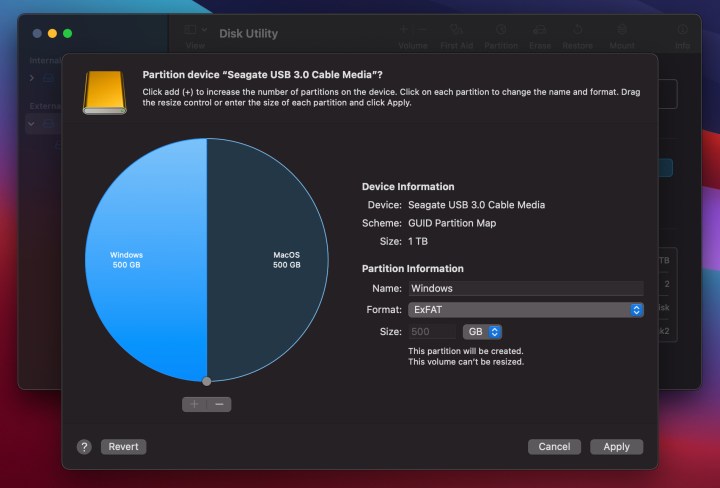
Step 10: Click the Partition button in an additional pop-up window to complete the process.
Step 11: Click the Done button to finish.
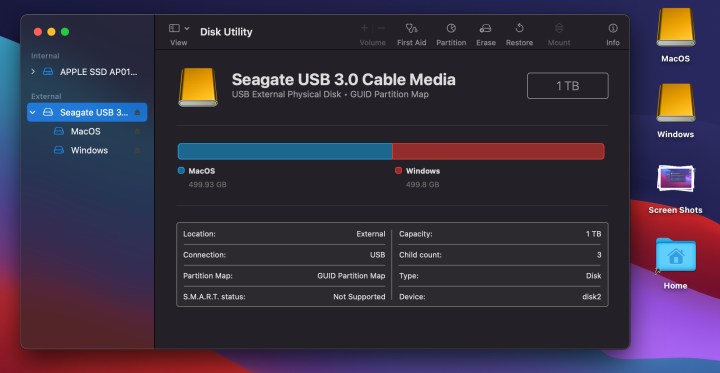
The result should look something like the image below. Note that two icons representing each drive should appear on your desktop, as shown.
It’s good to mention that the exFAT file system isn’t 100% reliable, so you might want to hook your hard drive up to a Windows computer and create a secondary Windows partition to NTFS. The Windows section contains our in-depth explanation of this.

Final notes
As you can see, partitioning a hard drive isn’t a complicated process, whether you’re using Windows or a Mac. You can also choose to install a paid application like Paragon’s Microsoft NTFS software or the free and open-source Tuxera on your Mac to enable NTFS to read/write support.
Can you share an external hard drive between Mac and PC?
Yes you can. For the best results though, you’re going to want to partition your external hard drive for optimized read-and-write performance for both Windows and MacOS.
As our guide indicates, if you’re primarily using Windows, you’ll want to have the Windows portion of your external HDD formatted for NTFS with a secondary exFAT partition for Mac compatibility.
If a Mac is your everyday machine, use the MacOS Extended format, with a secondary exFAT volume for Windows.
Is exFAT for both Mac and Windows?
Yes it is. The Extensible File Allocation Table (exFAT) format is one of the O.G. formatting methods, but it’s best used for files less than 4GB.
Keep in mind that even with third-party software, some features like Time Machine won’t work correctly with an NTFS file system.